

MAX Developer Edition preview is now available to developers worldwide and ICYMI, feel free to check out our getting started with MAX blog post. Today, I’d like to dive a little deeper and show how to build an end-to-end application using MAX. MAX consists of various tools and libraries including the Mojo programming language, but in this blog post, I’ll focus only on how to use MAX Serving to optimize and deploy models. To walk you through the workflow, and APIs, I’ve chosen a simple example of building an image classification service. At a high-level our workflow will involve these steps:
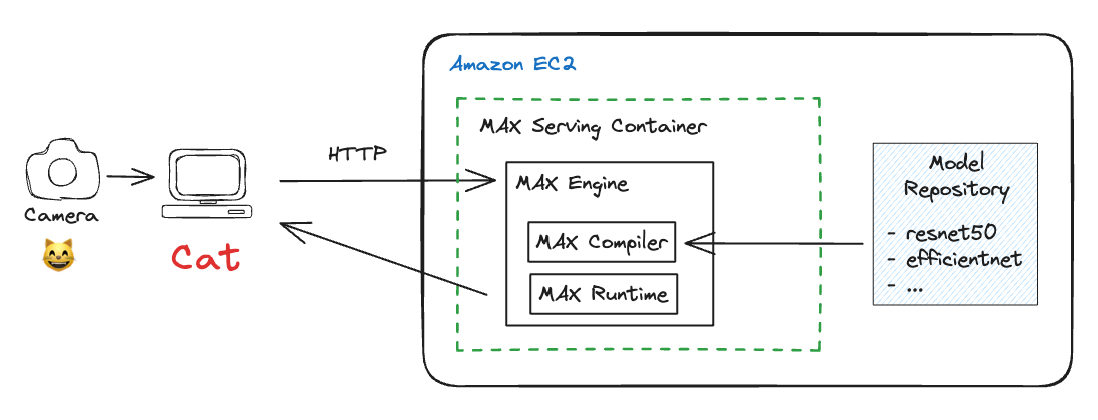
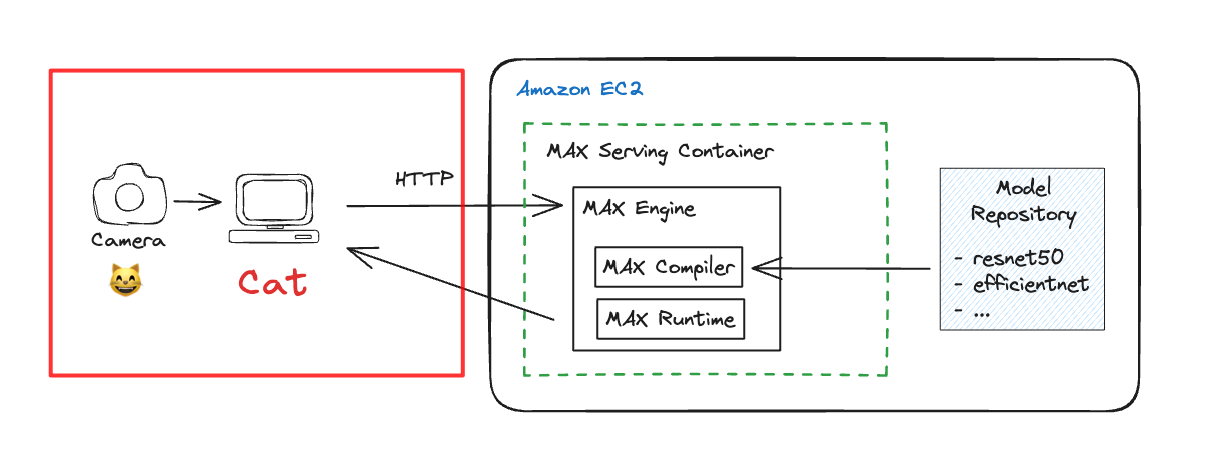
- Client computer (typically your laptop) captures image frames from your webcam
- Sends the image frame data to MAX Serving on a remote host Amazon EC2 instance running MAX Serving container (using HTTP requests)
- MAX Engine runtime in the MAX Serving container performs inference with either a ResNet50 or EfficientNet model, based on what the client requested, and generates class predictions
- Prediction results are sent back to the client computer and the predictions are overlaid on the webcam feed and displayed to the user (HTTP requests)
The overall architecture looks like this:
Here is the result of me waving my camera round my desk to classify objects in my setup.
Structure of this guide
This guide is structured into two parts:
- Host side: The system that runs the MAX Server service
- Client side: The system that submits inference requests to the host
We’ll discuss the setup in that order. Let’s start building!
Host side: Setting up your Amazon EC2 instance to run MAX Serving container
Getting started with MAX Serving is fairly straightforward. I ran the MAX Serving service on an Amazon EC2 c6i.4xlarge instance using a base Ubuntu AMI and installed Python and TensorFlow as needed, but you can also launch the instance using the AWS Deep Learning AMI which includes popular deep learning frameworks pre-installed. If you don’t have access to Amazon EC2 you can also run this on a local laptop or desktop, just make sure it meets the MAX system requirements. For instructions on launching an Amazon EC2 instance, see Getting Started with Amazon EC2 on AWS’s webpage.
If you’d like to follow along as you read this, get this Jupyter Notebook from GitHub. It’s a fully self-contained notebook that can orchestrate the entire workflow below.
The first step is to download the model we want to serve. While LLMs are all the rage today, my goal is to demonstrate MAX workflows and APIs, so I’ll be choosing tried and tested computer vision models: ResNet50 and EfficientNet. Both these models were trained on the ImageNet dataset and can identify 1000 classes of objects, which makes it a fun example to work with.
Let’s start with some basic imports and a function that can download the models using TensorFlow. Note: You'll need Docker, Python, and a recent version of TensorFlow installed to run this example.
MAX Serving also expects a config.pbtxt file for each model in it's directory which tell the server that it should use the MAX Engine backend for high-performance inference.
The output should look like this:
Now lets launch the MAX Serving container. MAX Serving container includes NVIDIA Trition Server with a MAX Engine backend to deliver high-performance inference. We provide a pre-built container image in Amazon Elastic Container Register (ECR): public.ecr.aws/modular/max-serving-de that you can use to deploy, so you don’t need to build a container from scratch.
In the docker run command above -v instructs docker to mount the model-repository with our models so that it can be accessed inside the container environment. Since the model-repository is a host volume, you can add more models on the fly and register it using the model control protocol described in the NVIDIA Triton Server documentation. Once the server is up and running you should see the following output:
Now we’re ready to test the inference server.
Local testing of the MAX Serving container
Before we head back to the client side, let’s make sure that the server is working as expected and serving inference results. You can submit HTTP requests directly from the terminal using curl but we’ll use the NVIDIA Trition Server Client so we can do this in Python.

In the above code, we download an image of a kitten and initialize the inference server client with url=localhost:8000 which is our host machine and using the default MAX Serving port.
Let’s submit our first inference request shall we? Use the model_name variable to tell MAX Serving which model to use to process the inference request.
There’s a lot of code in there that might seem scary to some, so allow me to summarize the general structure:
- Load image and preprocess: Models expect images to be of a certain size and normalized to improve convergence during training. We have to apply the same preprocessing steps to images during inference, which can vary model to model. We do this using the image_preprocess function.
- Inference request: We specify the model name, image shape, data type, and how to parse the output using InferInput and InferRequestedOutput functions
- Post-process: Results are sorted probabilities and indices returned as bytearray. We have to decode them, un-sort them so we can use the Keras’s handy decode function to get the classes.
First I’ll run this with model_name='resnet50' and then model_name='efficientnet' and you’ll see both give accurate results with minor differences as expected, since they have very different model architectures.
Client Side: Setting up client to send inference request to the host and receive results
Now let’s focus on the client side. By client, I mean devices that send requests to microservices such as MAX Serving running in the cloud. This could be your phone, your laptop, an IoT device or another microservice as part of a broader pipeline of inference and business applications.
We’re going to keep it simple and use our laptop or desktop as a client, which has a webcam connected to it.
On the client system, we’ll build on the testing code we used on the host system to test MAX Serving and build on it. Here are the steps we’ll follow:
- Initialize video feed from webcam
- Capture webcam feed using OpenCV Python package and pre-process to match the input expected by the model (ResNet50, EfficientNet)
- Submit inference request to MAX Serving
- Post-process results and extract predictions
- Overlay on camera feed frame and display on client system
- Check if user wants to break. If no, goto (2) else keep the camera rolling
You can find the complete client script called client-max-webcam.py on GitHub, I’ll only share the skeleton of the function here so you can map the above steps to code.
You can request inference from either ResNet50 or EfficientNet by updating the model_name variable.
Stuff I didn’t cover, but are very important
If you observe the client side code keenly, you’ll see that in InferenceServerClient I use url=localhost:8000 which is exactly the same as what I used in the host system. So what gives?. First, I applaud you for your keen observation. In my current setup, I’ve set up a secure tunnel from my client system MacBook Pro to the host Amazon EC2 at the same port, which lets me access network services on the host system securely. If you use VScode to connect to Amazon EC2, it can automatically do this for you. If you prefer terminal + Jupyter client like I do, then you can run this in another terminal window to setup the tunnel:
It’s important to note that real world deployments don’t work like this. A microservice running on Amazon EC2 is typically behind a service like Amazon API Gateway which can provide a public URL, handle authentication, perform routing and forwarding, and manage load balancing based on request volume etc.
You may also choose to deploy serving containers using container orchestration services such as Amazon EKS (managed Kubernetes service), Amazon ECS or fully managed deployment services offered by Amazon SageMaker. Each approach has its benefits and drawbacks and that discussion is beyond the scope of this blog post. It is however positively in-scope for future blog posts and if you’d like to see content on such topics, hit us up on Discord or submit an Issue on GitHub.
Conclusion
I hope you enjoyed this walkthrough as much as I enjoyed building it and writing about it. We’ve already shown you the performance MAX delivers, and hopefully in this blog post I showed that it’s quite easy to get started with MAX even if you’re new to it. The best way to get started is to start hacking – all the code used in this blog post is available on GitHub, give it a spin, share your feedback on discord!
Until next time! 🔥
Additional resources:
- Get started with downloading MAX
- Download and run MAX examples on GitHub
- Head over to the MAX docs to learn more about MAX Engine APIs and Mojo programming manual
- Join our Discord community
- Contribute to discussions on the Mojo and MAX GitHub
Report feedback, including issues on our Mojo and MAX GitHub tracker


