How do you guarantee that your software is portable, runs reliably, and scales easily in production environments? The short answer is: Use containers. Container technologies like Docker and Kubernetes are popular tools for building and deploying software applications, but until recently they were considered exotic infrastructure for IT/Ops experts.
Turns out, all the benefits of containers - portability, reproducibility, etc. - are also desirable properties to have in software development environments. Containers allow you to build lightweight and portable development environments that can easily be shared with others, and they guarantee reproducibility. Container technologies have been a feature of the Linux operating system for many years, but they only gained popularity for development after Docker introduced ease of use tools to build, run, version, and share container images.
In this blog post, I'll walk you through the process of setting up your container-based development environment for Mojo🔥 SDK using Docker. You can also find the same content in my video below.
Setup overview and prerequisites
To set up your containerized Mojo🔥 SDK development environment you’ll need access to a Linux system. This could either be a local laptop or workstation, or a remote machine in the cloud. Throughout this blog post, we’ll refer to this system as the host system that runs the container. If you’re using a remote host system, we’ll refer to your local laptop or desktop that connects to the host system as the client system. We’ll also assume that the Mojo code you will be developing is on the host system. This setup is illustrated in the diagram below.
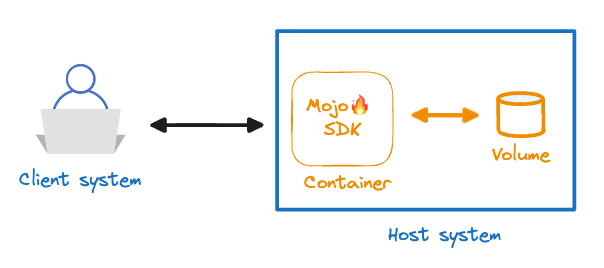
In this guide, I’ll be using an Amazon EC2 c6i.4xlarge instance running Ubuntu 20.04 as my host system and connecting to it from my laptop as my client system. Before we get started, I recommend installing and using Visual Studio Code with the following Visual Studio Code extensions:
- Mojo for Visual Studio Code
- Docker for Visual Studio Code
- Jupyter Extension for Visual Studio Code
- Visual Studio Code Remote - SSH
These extensions make it easy for you to attach your Visual Studio Code IDE on the client system to the containerized Mojo development environment in the host system. This setup will give you the familiar experience of developing locally on your laptop, but executing code within the container environment in the remote host system.
On the host system you will also need to install Docker Engine to use Docker CLI and other tools required to build and run containers.
Note: Visual Studio Code extensions installed on the client system will need to be reinstalled after you attach Visual Studio Code to the Mojo container environment.
Step 1: Clone the Mojo repository
First, launch Visual Studio Code on the host system. If you’re using a remote host system, launch Visual Studio Code on your client system and connect to the remote host system following the instructions in the Visual Studio Code documentation: Remote Development using SSH. If you’re using an Amazon EC2 instance as your host system, the EC2 documentation has instructions on how to connect to it using your private key. You’ll need to use the same ssh command in your Visual Studio Code remote connection setup.
In the Visual Studio Code terminal run the following command to clone the Mojo repository.
$ git clone https://github.com/modularml/mojo.git

After you’ve cloned the Mojo repository, use `cd` or the Visual Studio Explorer navigation pane on the left to open the Dockerfile: mojo/examples/docker/Dockerfile.mojosdk

What’s in the Dockerfile?
A Dockerfile contains instructions that the Docker CLI tool uses to build the container environment. The Dockerfile.mojosdk includes instructions to build a containerized Mojo development environment with specific OS type, OS and Python packages, and Mojo🔥 SDK that guarantees a consistent environment, no matter which system you build this on.
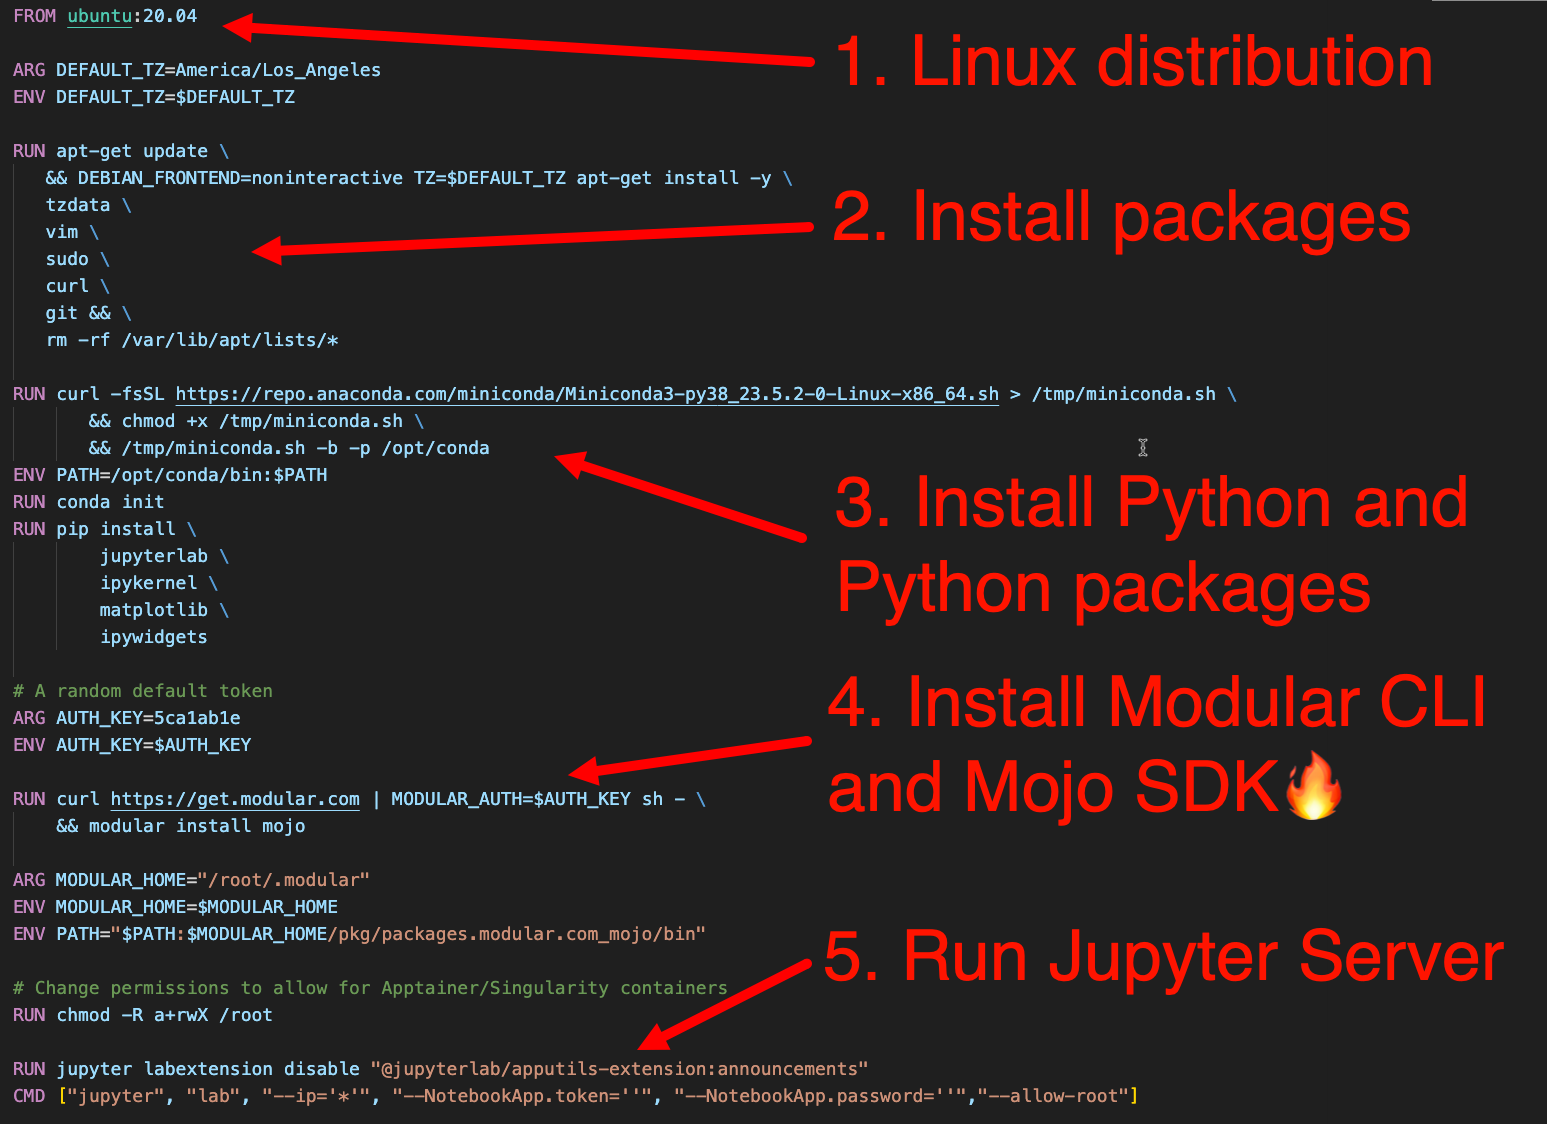
Step 2: Build the Mojo🔥 Docker container image
The next step is to build a container image using the instructions in Dockerfile.mojosdk. The Mojo SDK installation step in the Dockerfile needs an authentication key and you can find this by logging into developer.modular.com as shown below.
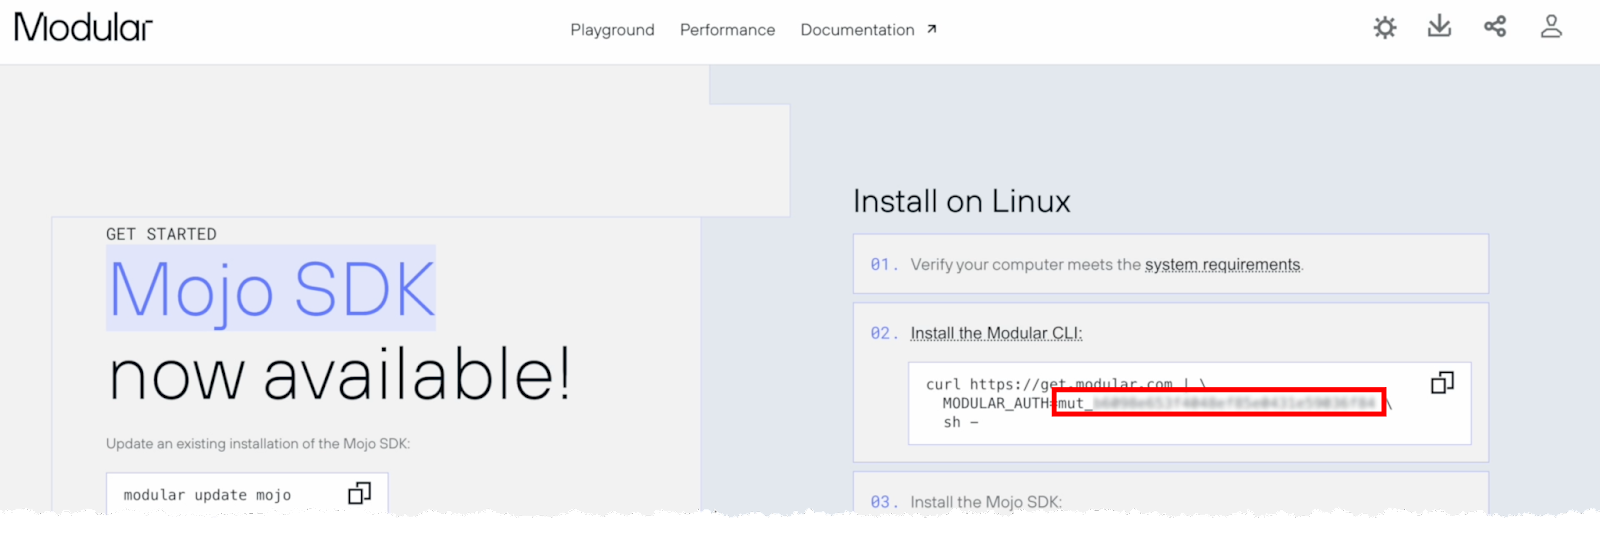
There are two ways to provide the authentication key to Docker.
Option 1: Update the auth key in the Dockerfile
This is the easiest option as it allows you to build Docker containers with a single click using the Visual Studio Code UI, but requires modifying the Dockerfile.mojosdk and exposing your authentication key in plain text.

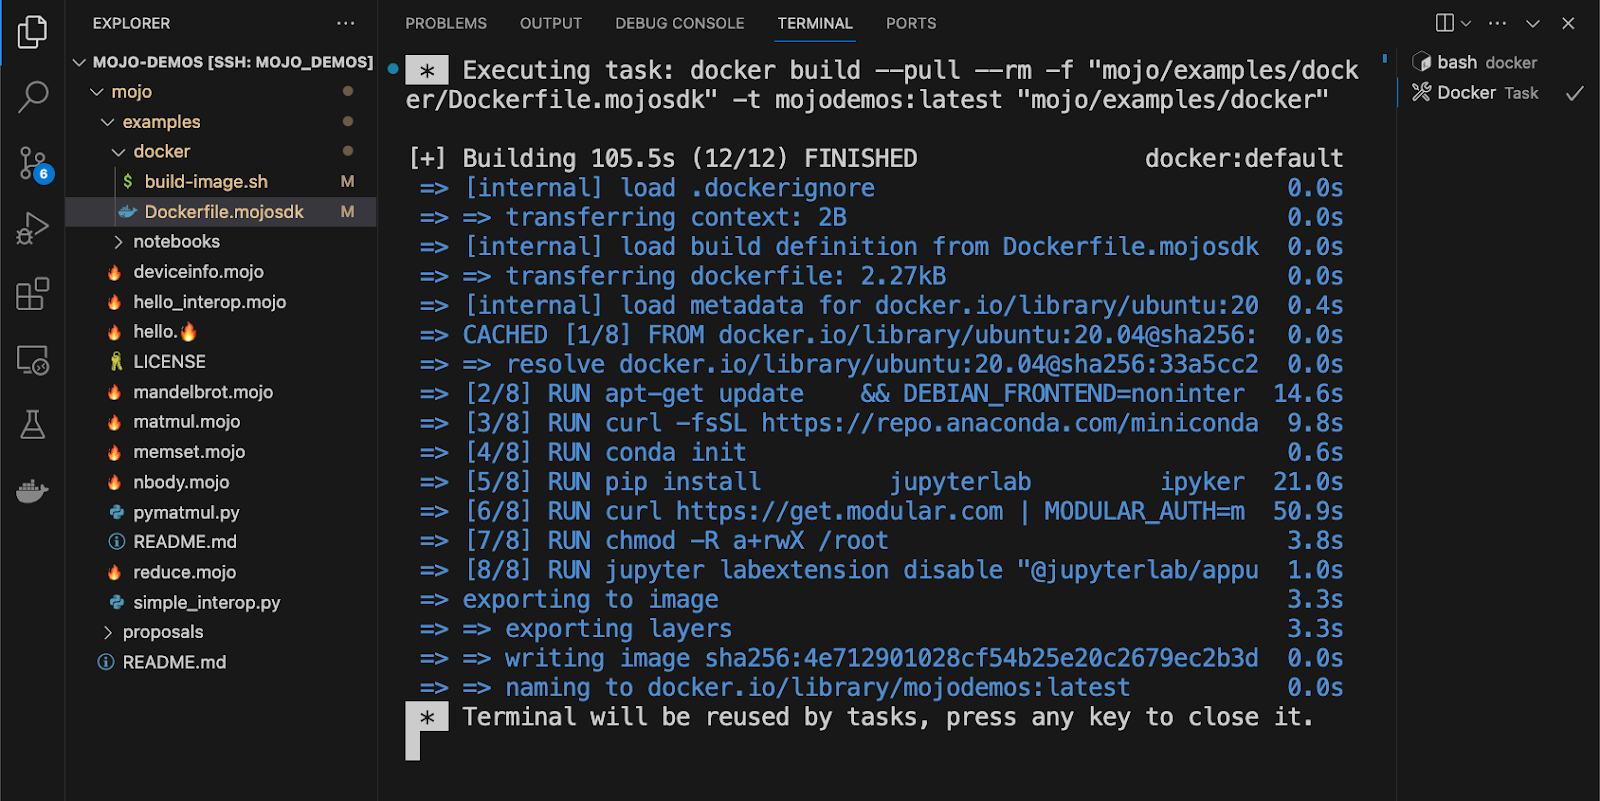
If you choose this option, then simply right-click on Dockerfile.mojosdk and click Build Image…

Choose the default name for the Docker container image or provide your own and hit enter.

This will kick off the build process:
Option 2: Pass the authentication key as a command line argument
If you don’t want to modify the Dockerfile then you can pass the authentication key as a command line argument to the Docker CLI as follows:
Or you can use the convenience script in the docker directory called build-image.sh:

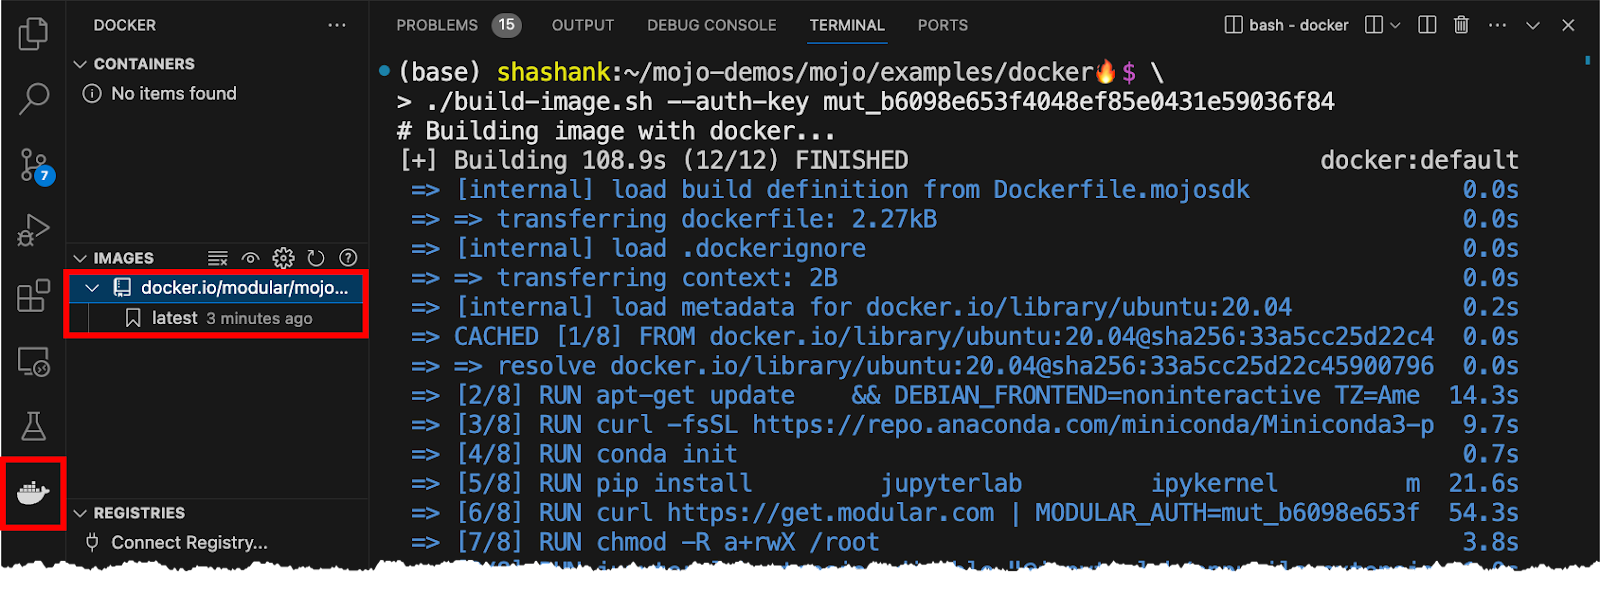
After the build process is complete you can verify that the image is built and available using the Docker CLI tool by running `docker images`. If you use the build-image.sh script to build the image it automatically names the image with the SDK version, current date, and time as shown below.

You can also use the Visual Studio Code Docker extension to view container images under the IMAGES section on the left after you click on the Docker extension button.
Step 3: Run the Mojo🔥 Docker container
Now that you have your Mojo SDK container image, the next step is to run it using the docker run command.
Containers are isolated environments and by default, they won’t have access to the host network or host storage volumes. This may be fine for stateless deployments, but for software development, we need access to our code, notebooks and, data artifacts inside the container environment. In the docker run command you see that use use -v to mount the current working directory as a volume inside the container. Before you run the above command, make sure to cd to the directory you want mounted into the container, or provide the exact path in the -v volume argument by replacing $PWD.
We also want to be able to access services such as the Jupyter server running inside the container. To do that we set --network=host to give the container access to the host network stack, so you can access all the services such as the Jupyter server that you run inside the container. Finally, make sure that the last line with Docker image name is the same as what you see in the output of docker images.

Step 4: Using the Mojo container for development
Now that the container is up and running, your Mojo development environment is ready for use. You have the choice of using Jupyter Lab IDE on your browser or attaching Visual Studio Code to the container environment to stay within the Visual Studio Code environment. We’ll discuss both options below.
Option 1: Developing with Jupyter Lab IDE
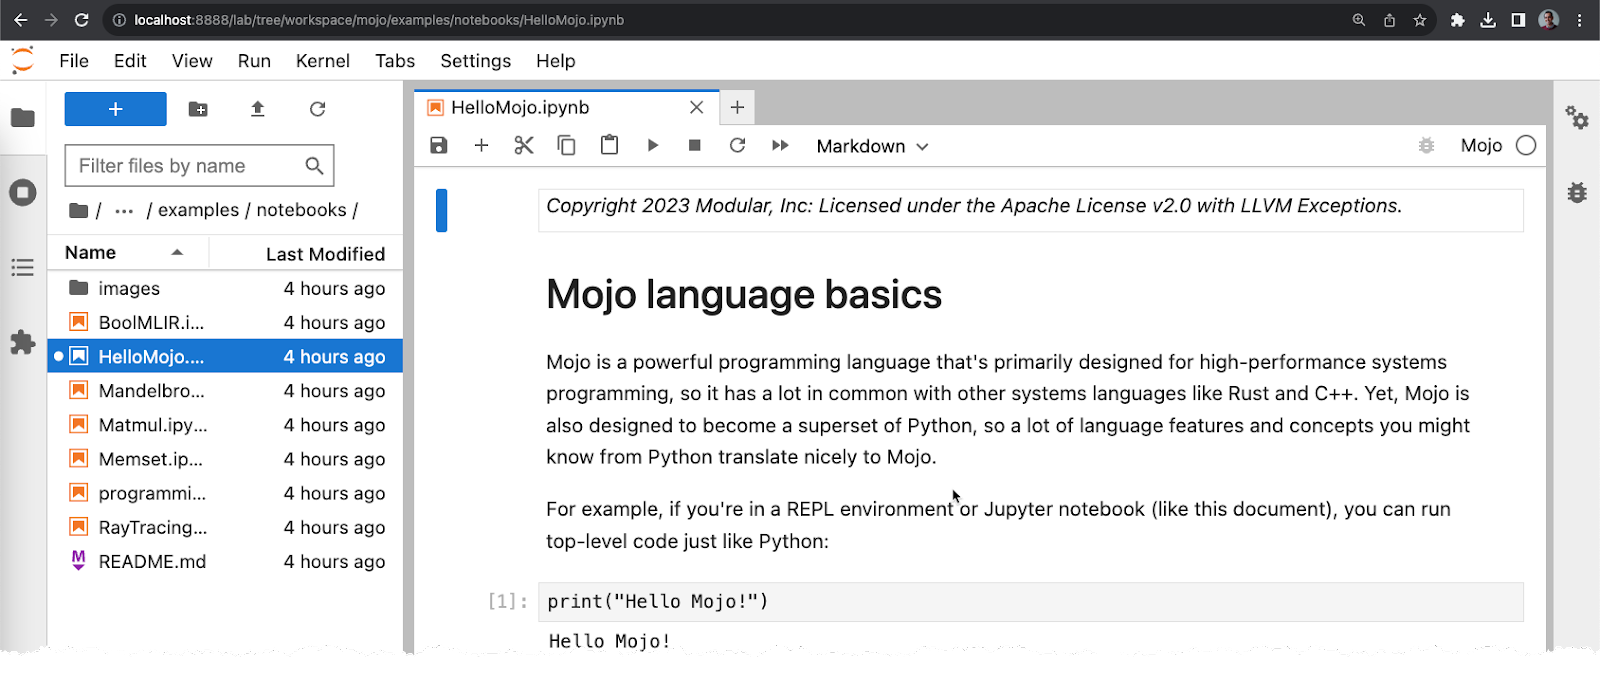
With the container running on the remote host machine, open up a browser and enter localhost:8888/lab and you see the Jupyter lab client. Navigate to workspace/mojo/examples/notebooks/HelloMojo.ipynb to run mojo notebooks running inside your docker container!
Note: Visual Studio Code should automatically set up port forwarding from the remote host system to the client system so that you can access the Jupyter server on localhost:8888. If you can’t access the Jupyter server you might need to open up a terminal on your client machine and setup a tunnel at port 8888 as follows:
ssh -N -L 8888:localhost:0000 -i ~/<path_to>/<pub_key> user@<IP_ADDR>
Option 2: Attaching Visual Studio Code to the Mojo🔥 container
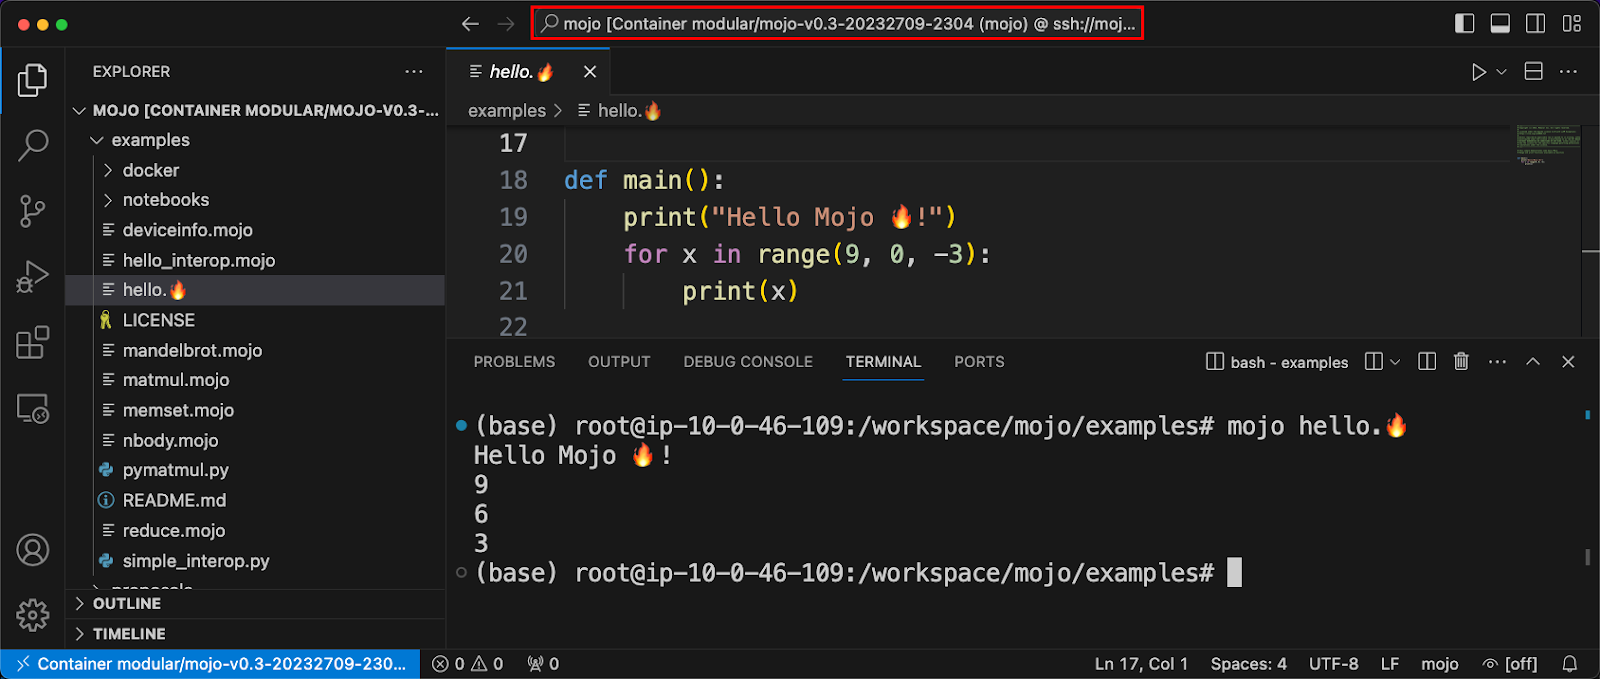
I prefer using Visual Studio Code for my development environment and if you do too, right-click on the running Mojo container in the Docker pane on the left and click on “Attach Visual Studio Code” as shown below.

You’ll be asked to confirm the container image to connect to, select the Mojo container, and hit enter.

This will open up a Visual Studio Code window that is attached to the running container in the host system! You can use this IDE environment to develop your Mojo projects just like you would on your local machine, but all your code will be executed in the container environment.
Step 5: Stopping and resuming Mojo🔥 containers
If you need a break from coding, just close the new Visual Studio Code window attached to the Docker container. The container will continue to run on the host system and you can re-attach using the steps in the previous section.
You can also stop the container by right-clicking on the container name in the Docker extension pane on the left and clicking Stop. This stops the container and all of its services from running. Start it back on at a later time and attach Visual Studio Code to it to continue development.
You can also completely remove the container, you won’t lose any changes to your code files because they are on the host system and were simply mounted as volumes inside the container. You will however lose changes that you made inside the container environment such as installing new packages.

Conclusion
My favorite reason for using containerized development environments is because it allows me to set up multiple isolated development environments so that I can easily experiment with packages, versions, and dependencies on the same system. If something doesn’t work in the container environment, it’s just as simple to remove the container and start over again from a clean environment. My second favorite reason is reproducibility. I can confidently share my code with a friend or colleague and fully expect them to reproduce an error or result as long as they run it in a container that was built and instantiated from the same Dockerfile as your environment.
If you enjoyed reading this blog post, you may also find my video walkthrough on how to use Mojo SDK with Docker containers useful. We’d love to hear from you! Join our awesome community on Discord and share your Mojo journey with us on social media.
Until next time 🔥!

